
I had so much fun playing with the Distress Oxide Inks in the last video, I knew I had to use them for my Mother’s Day card for my mom. I loved the chalky background and the colors I used for my watercolor paper comparison (see that video here ) were a perfect combination with the flower embellishment and olive green background paper.
Distress Oxide Inks Decorative Panel
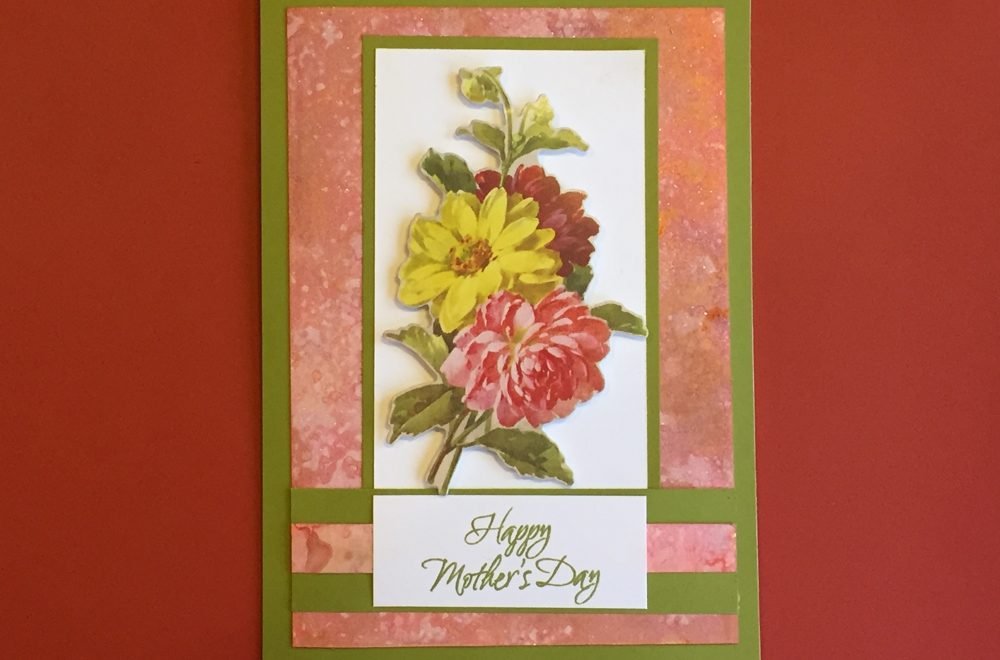
For this card, I used three colors of Distress Oxide Inks to create the background panel on the card. I squished the pads onto my craft mat and spritzed the ink with some water from a spray bottle. I used Fired Brick, Worn Lipstick, and Spiced Marmalade on some Strathmore Mixed Media paper. Using the same technique as in the last post, I built up layers of color and did a final spray of large droplets of water when I was happy with the coverage.
The colors were chosen because they paired perfectly with this flower selection from the Tim Holtz Botanical ephemera collection. I decided to keep it simple and used plain white cardstock to mount the ephemera using some foam tape. There were only a couple of pieces of ephemera that were large enough for a 5×7 card.
When I was done with the decorative panel, I decided to add a bit of shimmer to it before compiling all of the layers together. I used some Sheer Shimmer Spritz in Sparkle and sprayed it from approximately 24″ above the panel.


Building the Card
Once the panel was done, I started to build the layers. The decorative panel was cut to leave a 1/4″ reveal all around. It was attached to a piece of green paper from the Recollections Spice Market collection. I like these paper packs because they give you an economical selection of several coordinating colors of paper. Plus, when building layer upon layer, the paper is thinner than single sheet cardstock. This helps keep the overall weight under an ounce for mailing.
The olive green in this pack was the perfect complement to the ephemera and the decorative panel. I used another smaller piece to set off the white panel that the ephemera was mounted to, adding additional dimension to the card.
Sentiments
Being pigment inks, the Distress Oxide inks were perfect for stamping the sentiment on the front and on the inside of the card. I used a Mother’s Day stamp set from My Sentiments Exactly that I purchased two years ago. I checked and it is still in stock at Amazon as of this posting. It turns out that the Peeled Paint Oxide ink matched the olive paper perfectly (happy dance!).
I like to heat emboss my sentiments and the pigment ink worked perfectly. Because the ink pads were new, new, new, I first stamped onto some scrap paper to judge how juicy they were. There was some smudging, so I was careful with how much I applied to the stamp when I inked it up. That helped to ensure the words came out crisp and clear.
Final Assembly
I carefully aligned each layer on top the next to leave an even reveal all around. The white panel shows a 1/8″ reveal of the underlying green panel, and the decorative Oxide panel shows a 1/4″ reveal. With the inside of my card base stamped with the interior sentiment, I used my MISTI tool to perfectly align the completed card front to the card base. The MISTI ensures that the edges line up perfectly along two sides. It’s nice when you can get multiple uses from a product, and this is the perfect example of that.
With that, my card was done. Now for the biggest challenge, making sure it gets in the mail in time to reach Mom for Mother’s Day!
Watch the whole thing come together here:
*Product links provided on this page are not affiliate links. They are included for your convenience if you’d like to purchase these products. No compensation is earned by me if you choose to use the link.


