That last haunted house that we visited, locked behind a graveyard gate, was filled with nothing but dusty furniture and cobwebs. Up ahead, another house of mayhem awaits, a sinister yellow glow from the windows. Another graveyard to be traversed, standing between you and your final destination. Something moves in the shadows, leaves rustling. The noise is coming closer and you try to run, but the path to the house is blocked by a gate. A very solid gate. It’s padlocked, leaving you nowhere to go but to face your fears. You turn and there’s….
nothing but a squirrel. He’s out gathering nuts to stash away for what will be a cold and snowy winter. As you look around, you realize this house looks a lot like the others you’ve come across. Maybe this is one of those production subdivision builders of haunted houses. And it looks like they all used the same stone mason for their gravestones. But that gate! Oh that spectacular gate.
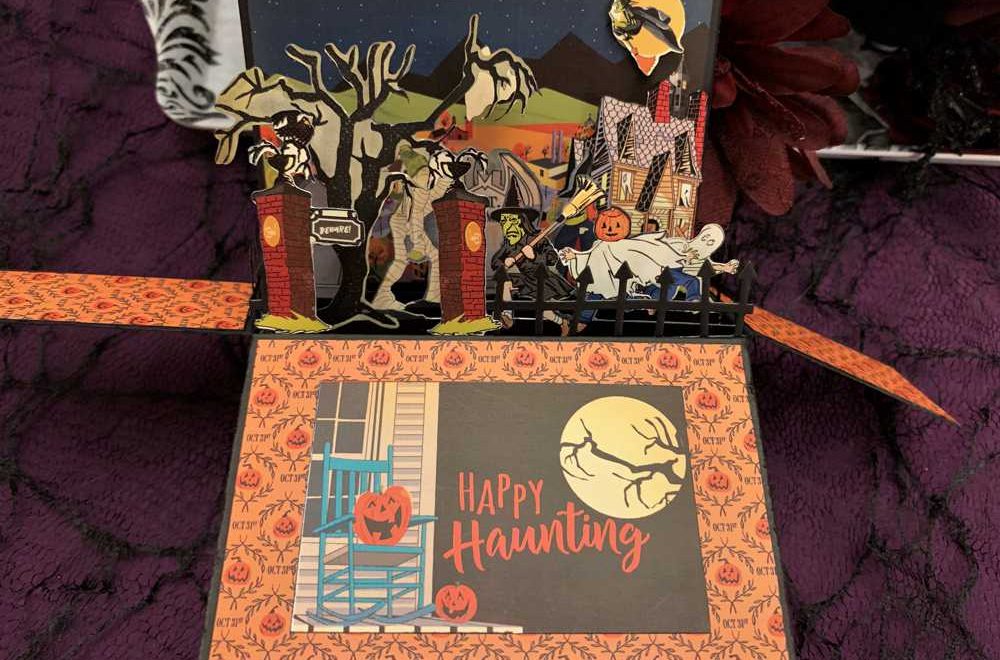
I had searched forever for a graveyard gate. I wanted one large enough to use as a feature in a mini-album. Most were either dies that were way too small or were digital cutting files that lacked any detail or imagination. Imagine my disappointment when an image search turned up the perfect gate, only to realize it was on a placemat and not a crafting implement, When I saw this one featured in this year’s annual holiday catalog at Stampin’ Up, I actually placed my order the morning that the catalog first came available to non-demonstrators. I wasn’t going to risk it going on back-order. And I haven’t been disappointed.


As one demonstrator pointed out, there are several ways you can cut apart this die cut:
- Make the gate shorter by removing the bottom portion
- Remove the arched “gate” topping and it resembles a straight-line fence
- Remove even more height by removing the top portion for a short, straight-line fence
- Retain just the decorative panels and it’s not a gate or a fence anymore, it just a decorative die cut that can be used in any kind of project
The possibilities are limited only by your imagination. I’m picturing a sweet spring scene with the gate cut out of some silver metallic paper. Or in copper paper, worked into a rustic Christmas scene.
What’s Unique About This Card?
The secret weapon used in this card is the Starry Night background paper from Ella and Viv. I’ve seen lots and lots of people use Distress Oxide inks to make beautiful starry night skies. But for some reason, that skill escapes me. Mine never look as vibrant or as realistic. I made a background for the Village Graveyard Box Card, and it’s muted tone worked perfectly for that card. But I wanted something a little more vibrant here. When I saw this at my local craft store’s happy hour (and let’s be honest, isn’t any time spent at your craft store a happy hour?) I picked up a couple sheets knowing it would come in very handy.
Another touch of realism on this card is the embossing on the gate pillars. Using a stone embossing folder from Darice, I ran some black ink along the ridges that would press down and become the grout lines. If I’m not mistaken, it was–unintuitively–the back side of the folder, not the front. When it comes out of the Big Shot, the black ink becomes the grout lines between the stones. Since it just adds to the creepy weathered look, I don’t stress if some of it smears onto the stone fronts
Lastly, I sandwiched a piece of clear acetate between the front and back layers of the left panel. I did this for stability, and it may not have been necessary after adhering two layers of gate together. But, I like the look, so I’d probably do it again.
Materials List
There were relatively few materials used in this card. And, despite how fancy it is, and it’s heft, it went together fairly quick.
- Neenah Solar White Classic Crest cardstock, 1 sheet
- Black cardstock, 2 sheets
- Acetate, 1 sheet
- Grey cardstock, 1/2 sheet, for pillars, path, and tombstones
- Green cardstock, scrap
- Ella & Viv Starry Night paper
- Stampin’ Up Graveyard Gate die set
- Inka Gold, Brown Gold
- Vellum, scrap
- Yellow ink (windows and moon)
- Crackle stamp (Oct 2016 Paper Pumpkin), Bo Bunny Rough It Up or Stained Textures could be substituted
- Black ink
- Darice stone embossing folder, Brick Wall